One of the hottest new trends this spring is colorblocking, but not everyone knows how to put it together for clothes.

Why not try it out on your nails instead? You can keep it simple within
the same color family or go bold and crazy—whatever suits your mood!
Start with your favorite basecoat and paint your nails the base color. I
find it’s easiest to use a crème polish for this step, and it’s best if
this is the lightest color of the bunch, since it doesn’t need to cover
anything else. Then top with a fast-dry topcoat.


Next, pull off a small piece of Scotch tape (you won’t need more than
an inch at a time) and put it against your hand and pull it off several
times until most of the stickiness is gone. This will help make sure the
polish doesn’t pull when you start applying the next color. (If you are
dressing up a current manicure, this is where you will start.)
Once your base layer is dry, it’s time to start the colorblocking. I like each nail to be unique, so I tape each one differently. Remember to make sure the tape is lying down flat so the polish doesn’t seep underneath and that the tape is at an angle so that it will eventually form triangles.


Once your base layer is dry, it’s time to start the colorblocking. I like each nail to be unique, so I tape each one differently. Remember to make sure the tape is lying down flat so the polish doesn’t seep underneath and that the tape is at an angle so that it will eventually form triangles.


Carefully paint your nail so the exposed part is your second color and
make sure to paint over the tape so you have clean lines. It’s best to
work quickly and with your second most opaque color for this layer.


Wait about thirty seconds after you paint over the tape and carefully
pull the tape up to reveal a clean little triangle! Now each nail might
be a different shape, depending on how you taped them up originally!
At this point, your nails will have two out of the three colors done, so it’s time to add your top coat again. While your nails are drying, you might want to start sticking more tape against your hand for the next round.

At this point, your nails will have two out of the three colors done, so it’s time to add your top coat again. While your nails are drying, you might want to start sticking more tape against your hand for the next round.
Now it’s time to tape off the last part of the color block. Like you did
for the first part, you’ll want to tape your nails at an angle to make
the last triangle on each nail. On a few nails, you will need two pieces
of tape to make the triangle in the middle, so be careful to make sure
everything lines up with the colors you have already painted.
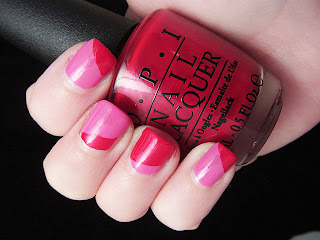
Just like before, paint over the exposed part of your nail and the tape to get the third part of your color block on. Once it’s painted, wait thirty seconds and then pull it off to see the amazing color block you just created! Add a topcoat and you are finished!

Just like before, paint over the exposed part of your nail and the tape to get the third part of your color block on. Once it’s painted, wait thirty seconds and then pull it off to see the amazing color block you just created! Add a topcoat and you are finished!
Komentarų nėra:
Rašyti komentarą